

Low back calisthenics can be your solution to persistent lower back pain without spending money on gym memberships or equipment. These bodyweight exercises strengthen the muscles supporting your spine while improving flexibility and reducing discomfort. Let’s dive into six powerful moves that deliver real results and transform your daily life.
Understanding Low Back Pain and the Power of Calisthenics
Lower back pain affects approximately 80% of adults at some point in their lives, disrupting work, sleep, and everyday activities. The modern sedentary lifestyle weakens crucial support muscles around your spine, creating dangerous imbalances.
When you sit for 8-10 hours daily, your hip flexors tighten, your glutes weaken, and your core muscles essentially shut down. Calisthenics for beginners provides a safe, progressive way to rebuild strength without aggravating existing pain or requiring special equipment.
The Science Behind Bodyweight Training for Back Health
When you perform controlled bodyweight exercises, you increase blood flow to affected areas, delivering essential nutrients and oxygen that accelerate healing.
This calisthenic lower body workout approach engages multiple muscle groups simultaneously, creating functional strength that translates directly into improved daily activities. The proprioceptive feedback you receive during these exercises teaches your nervous system to maintain proper spinal alignment automatically.
1. Cat-Cow Stretch
The Cat-Cow stretch serves as the perfect entry point for anyone beginning their low back calisthenics journey. This gentle movement mobilizes your entire spinal column from your neck down to your tailbone.
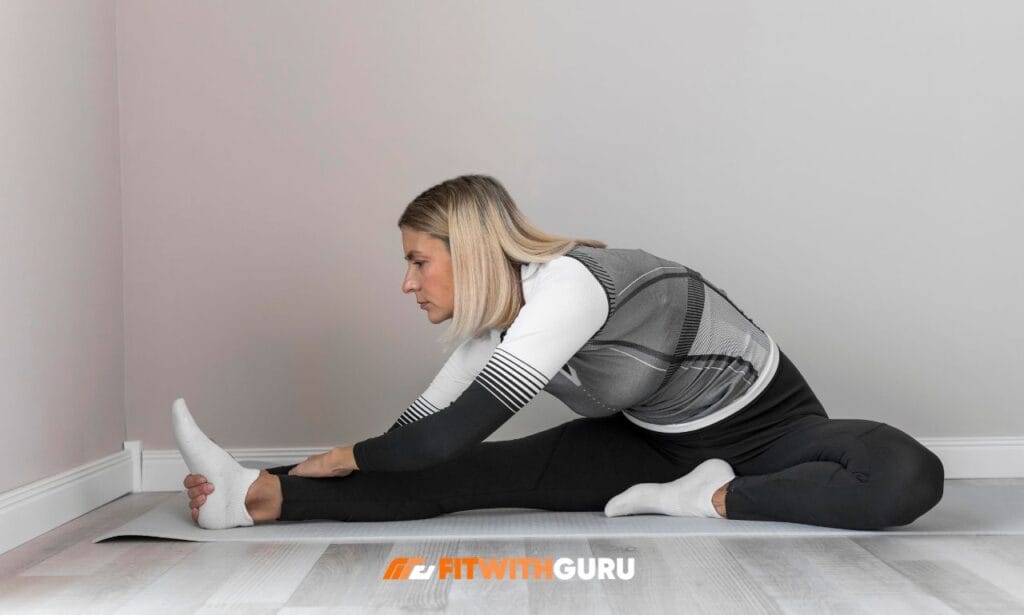
How to Perform:
- Start on your hands and knees with wrists positioned directly under shoulders
- Place knees hip-width apart and maintain a neutral spine
- Inhale deeply as you drop your belly toward the floor
- Lift your chest and tailbone up toward the ceiling, creating a gentle arch
- Look slightly upward without straining your neck
- Exhale completely as you round your spine upward like a frightened cat
- Tuck your chin to your chest and draw your belly button toward your spine
- Push the floor away with your hands to maximize the stretch
- Flow smoothly between these positions for 10-15 repetitions
- Move slowly and deliberately, taking 3-4 seconds for each transition
This movement increases synovial fluid production in spinal joints, improving lubrication and reducing friction that contributes to discomfort and stiffness.
2. Glute Bridge
The glute bridge represents one of the most effective lower body exercises for relieving lower back pain by strengthening your posterior chain. Your glutes are the largest muscle group in your body and should be the primary hip extensors during daily activities.
When glutes are weak, your lower back compensates by doing work it wasn’t designed to handle, leading to overuse and pain.
How to Perform:
- Lie flat on your back with knees bent at approximately 90 degrees
- Place feet flat on the floor about hip-width apart
- Position arms comfortably at your sides with palms facing down
- Engage your core by drawing your belly button slightly toward your spine
- To raise your hips toward the ceiling, push through your heels.
- Squeeze your glutes forcefully at the top of the movement
- Create a straight line from your shoulders through your hips to your knees
- Avoid excessive arching in your lower back—the lift should come from your glutes
- Hold the top position for 2-3 seconds while maintaining constant tension
- Lower your hips back down with control, taking 2-3 seconds
- Stop just before your glutes touch the floor and immediately begin the next rep
- Complete 3 sets of 12-15 repetitions with 45 seconds rest between sets
3. Bird Dog
The bird dog exercise combines anti-rotation strength with coordinated movement patterns that directly translate to everyday functional activities. This movement teaches your core to stabilize your spine while your limbs move independently—a crucial skill for preventing injury during daily tasks.
How to Perform:
- Start on your hands and knees in a quadrupedal position.
- Position hands directly under shoulders and knees under hips
- Maintain a neutral spine with natural curves intact
- Engage your core by bracing as if someone might punch your stomach
- At the same time, extend your left leg backward and your right arm forward.
- Reach until both limbs are parallel to the floor
- Keep your extended arm and leg in line with your torso
- Focus intensely on keeping your hips level—no rotation allowed
- Imagine balancing a glass of water on your lower back
- Hold this position for 5-8 seconds while breathing normally
- Return to the starting position with control
- Repeat on the other side (right leg, left arm).
- Complete 3 sets of 8-10 repetitions per side
- Rest 30 seconds between sets
This calisthenics lower body workout at home exercise activates your multifidus muscles—small stabilizers along your spine that are often weak in people with chronic back pain.
4. Superman Hold
The Superman hold directly strengthens the erector spinae muscles that run along both sides of your spine from your skull to your sacrum. These muscles provide crucial support for maintaining proper posture throughout your day and preventing fatigue-related slouching.
How to Perform:
- Lie face-down on a comfortable mat or carpet
- Extend your arms straight overhead with palms facing down
- Keep your legs straight and together behind you
- Engage your core and squeeze your glutes
- Simultaneously lift your arms, chest, and legs off the ground
- Contract your lower back muscles and glutes to create the lift
- Raise your limbs 6-8 inches off the floor—higher isn’t better
- Keep your neck in a neutral position by looking slightly down
- Maintain this lifted position for 10-20 seconds
- Breathe steadily throughout the hold—don’t hold your breath
- Lower back down with control
- Rest for 10-15 seconds before the next repetition
- Perform 3-5 total repetitions with adequate rest between holds
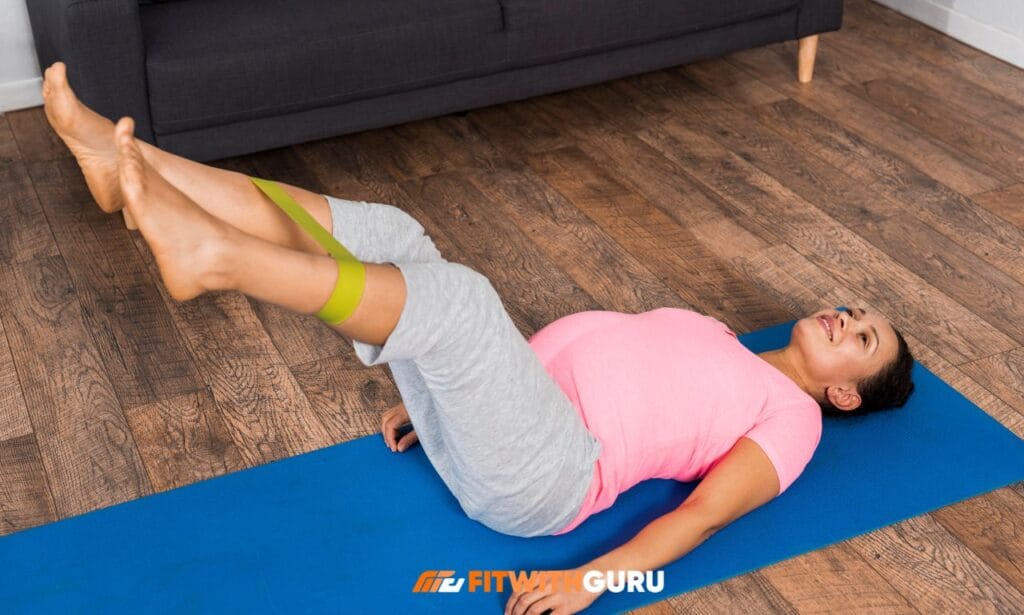
5. Dead Bug
The dead bug exercise teaches your core to resist excessive arching in your lower back, a common compensation pattern that leads to pain and injury.
How to Perform:
- Lie flat on your back on a comfortable surface
- Extend your arms straight toward the ceiling, perpendicular to the floor
- Bend your knees at 90 degrees with shins parallel to the floor
- Press your lower back firmly against the floor by engaging your core
- Slowly lower your right arm overhead toward the floor
- Simultaneously straighten and lower your left leg toward the floor
- Keep both limbs hovering 2-3 inches above the ground
- Your lower back must remain pressed flat against the floor—this is critical
- If your back arches, you’ve gone too far
- Hold the extended position for 1-2 seconds
- Return to the starting position with control
- On the other side (left arm, right leg), repeat.
- Move deliberately and maintain constant core tension throughout
- Perform 3 sets of 10 repetitions per side
- Rest 30 seconds between sets
6. Pelvic Tilt
Pelvic tilts serve as a foundational movement pattern that improves your ability to control your lumbar spine position consciously.
How to Perform:
- Lie on your back with knees bent and feet flat on the floor
- Place feet hip-width apart for stability
- Rest your arms comfortably at your sides with palms down
- Start by finding your neutral spine position
- Gently tilt your pelvis backward by engaging your lower abdominals
- Press your lower back completely flat into the floor
- Draw your pubic bone toward your ribcage
- Hold this posterior tilt position for 5 seconds while breathing normally
- Then tilt your pelvis forward in the opposite direction
- Allow a small arch to form under your lower back
- Your tailbone should tilt slightly off the floor
- Hold this anterior tilt for 5 seconds
- Continue alternating smoothly between these positions for 15-20 repetitions
- Move slowly without jerking or using momentum
This subtle movement increases proprioceptive awareness of your spinal position and helps you understand how to engage your core muscles properly during other exercises.
Creating Your Complete Low Back Calisthenics Routine
Consistency trumps intensity when building a sustainable calisthenics for beginners program that relieves pain and prevents future issues. Start with just 10-15 minutes daily rather than attempting 60-minute marathon sessions that you’ll abandon after a week.
Your Weekly Schedule:
Monday, Wednesday, Friday, Saturday:
- Cat-Cow Stretch: 2 sets of 12-15 reps
- Glute Bridge: 3 sets of 12-15 reps
- Bird Dog: 3 sets of 8-10 reps each side
- Superman Hold: 3 sets of 15-20 seconds
- Dead Bug: 3 sets of 10 reps each side
- Pelvic Tilt: 2 sets of 15-20 reps
Tuesday, Thursday, Sunday: Rest or light walking
Rest 30-45 seconds between sets for dynamic movements and 45-60 seconds after isometric holds. Morning sessions often work best because your muscles are fresh and you establish a consistent habit before daily responsibilities interfere. Track your progress by noting how exercises feel rather than obsessing over performance metrics like repetition counts or hold times.
Most people see noticeable improvements within 2-3 weeks of consistent practice.
Progressive Overload Strategy
1-2 weeks: Focus entirely on form and learning proper movement patterns.
Week 3-4: Increase repetitions by 2-3 per set or add 2-3 seconds to hold times.
5-6 weeks: Introduce one advanced variation for an exercise that feels easy.
Week 7+: Continue gradual progression while maintaining perfect form.
Common Mistakes That Sabotage Your Progress
Understanding what NOT to do is just as important as knowing proper technique when it comes to low back calisthenics.
Rushing Through Movements: Moving too quickly eliminates the muscle control and time under tension that create strength gains. Each repetition should take 4-6 seconds total—2-3 seconds in each direction.
Holding Your Breath: Many people unconsciously hold their breath during challenging exercises, which increases blood pressure and reduces oxygen delivery to working muscles.
Ignoring Pain Signals: Sharp, shooting, or radiating pain means stop immediately and reassess your form or exercise selection. Dull muscle burning during the last few reps indicates you’re working appropriately.
Skipping the Warm-Up: Spend 3-5 minutes doing light cardio like marching in place or gentle yoga stretches before beginning your calisthenic lower body workout routine.
When to Progress Your Low Back Calisthenics Routine
Knowing when and how to increase difficulty ensures continued improvement without overwhelming your body’s adaptation capacity.
Signs You’re Ready to Progress:
- You complete all sets and reps with perfect form and minimal fatigue
- The exercises feel significantly easier than they did 2-3 weeks ago
- You experience no pain during or after your sessions
- You’ve maintained your current routine consistently for 3-4 weeks
How to Progress Safely:
Increase repetitions by 2-3 per set before adding new variations. Add 5-10 seconds to isometric hold times. Slow down your movement tempo to increase time under tension. Introduce one advanced variation while keeping other exercises at your current level.
Frequently Asked Questions
How quickly will low back calisthenics relieve my pain?
Most people notice measurable improvements in mobility and reduced discomfort within 2-3 weeks of consistent practice with these calisthenic lower body workout movements. Individual results vary significantly based on the severity of your condition, how long you’ve had symptoms, and your adherence to the program. Acute pain from recent injury often responds faster than chronic issues that have developed over months or years.
Can I perform these exercises if I have a herniated disc?
Always consult your healthcare provider before beginning any exercise program if you have a diagnosed spinal condition like a herniated disc. Many physical therapists actually recommend these exact movements for disc issues because they strengthen surrounding muscles without excessive compression.
What makes calisthenics better than using weights for lower back pain?
Bodyweight exercises allow you to focus entirely on movement quality and neuromuscular control without the added variable of external resistance that might exceed your current capacity. The calisthenic low body workout approach reduces compression forces on your spine while still providing adequate stimulus for strength development. You can also perform these exercises anywhere without equipment, making consistency dramatically easier to maintain compared to gym-dependent routines.
Should I exercise if my lower back hurts today?
Gentle movement often helps reduce pain better than complete rest because it increases blood flow, reduces stiffness, and prevents muscle atrophy. You must distinguish between productive discomfort from working muscles and harmful pain signals indicating tissue damage.
How do I know if I’m doing these exercises correctly?
Recording yourself performing the movements from various angles allows you to compare your form against demonstration videos and identify potential issues. The sensations you experience during exercises provide valuable internal feedback—you should feel target muscles working rather than joint stress or sharp pain.
Conclusion
Low back calisthenics offers a scientifically-validated, accessible solution for anyone suffering from lower back discomfort or seeking to prevent future problems through intelligent movement. The six exercises outlined in this comprehensive guide target all the critical muscle groups that support your spine, creating a holistic approach to back health.
Your commitment to performing these calisthenics for beginners movements consistently will determine your success far more than any single factor. Start small with just 10-15 minutes per day, remain patient with your progress, and trust that your body will respond positively to consistent, intelligent training.
The beauty of this calisthenic lower body workout lies in its elegant simplicity and proven effectiveness, requiring nothing but your body and a small space.